Pages

Friday, April 20, 2012

Opening .run file in Ubuntu 11.10

I was working with ExtJS and found Sencha Architect 2, a GUI tool for writing ExtJS. I thought of trying it and downloaded it from INTERNET. But to my surprise, I got a .run file copied to my hard drive. After searching a bit I got to know about .run file. A .run is a packaged format which contains software and a small program to install the software.

To open .run file in Ubuntu 11.10, follow below steps.
  1. Right click on the .run file
  2. Select properties
  3. Open permissions tab an make sure "Allow executing file as program" is checked.
  4. Double-click the .run file to open it. A dialog box should appear and follow on screen information.

Get the process id by its name

ps -ef | grep mysql

Installing Eclipse J2EE Indigo SR2 in Ubuntu 11.10

In this section we will see how to install Eclipse J2EE Indigo .

Installing eclipse
  1. Install .gz file from eclipse web site
  2. I will copy the .gz file to ~/softwares
  3. Unpack the .gz file
    tar -zxf eclipse-jee-indigo-SR2-linux-gtk.tar.gz
    

  4. You will have a new directory "eclipse"
  5. Create desktop shortcut by right clicking eclipse -> Copy To -> Desktop
  6. Launch eclipse from desktop

Know if you are Running 32-bit or 64-bit Linux?

Open terminal and run the below command
uname -m

If the response is i686, you have a 32-bit version of Linux.
If the response is x86_64, you have a 64-bit version of Linux.

Installing Apache Maven 3.0.4 in Ubuntu 11.10

Installing Apache Maven 3.0.4

  1. mkdir ~/softwares
  2. cd ~/softwares
  3. Get the latest release from Apache web site using the command
    wget http://mirrors.sonic.net/apache/maven/binaries/apache-maven-3.0.4-bin.tar.gz
  4. Unpack the .gz file using command
    tar -zxf apache-maven-3.0.4-bin.tar.gz
  5. Create a link to this called apache-maven as that makes easy to update new releases. Use the command below for this
    ln -s apache-maven-3.0.4/ apache-maven
  6. Set the environment variable, open /etc/environment file
    sudo vi /etc/environment
  7. Append the following to the file
    PATH="/usr/local/sbin:/usr/local/bin:/usr/sbin:/usr/bin:/sbin:/bin:/usr/games:/home/manohar/softwares/apache-maven/bin"
    JAVA_HOME=/usr/lib/jvm/java-6-sun-1.6.0.06
    M2_HOME=/home/manohar/softwares/apache-maven
    MAVEN_HOME=/home/manohar/softwares/apache-maven
    M2_HOME=/home/manohar/softwares/apache-maven
  8. Log out and login again to see the effect.
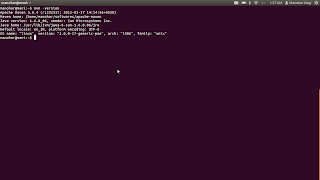
  9. Test maven installation using the command
    mvn -version

Apache ANT error : Unable to locate tools.jar

Problem Statement: While doing an ant build, if you get an error message saying
Unable to locate tools.jar

Problem Solution:
Follow the steps to resolve this issue.
  1. See if you have environment variable names JAVA_HOME, if not create it
  2. In Linux and Mac, Copy following statement and append to /etc/profile or .bashrc file, make systec set JAVA_HOME into system environment variable.
    export JAVA_HOME="/usr/lib/jvm/java-6-sun-1.6.0.06"
  3. In Windows, go to environment variables and add new variable with name JAVA_HOME and the value as Java's location wherever installed.

Installing Apache ANT 1.8.2 in Ubuntu 11.10

Installing Apache ANT is quite straight forward. Follow the below steps.

  1. Open terminal and type ant command. This is just to verify if ant is installed or not.
  2. sudo apt-get -u install ant

  3. Ant version test ( ant -v )

    Thursday, April 19, 2012

    Installing MySQL Server 5.1 and MySQL Workbench 5.2.39 in Ubuntu 11.10

    Here we will see how to install MySQL server and MySQL workbench in Ubuntu 11.10. I will install MySQL server 5.1 as part of this tutorial.

    So here we go....

    Install MySQL Server 5.1
    1. Check for existing mysql installations.
    2. sudo apt-get install mysql-server


      Enter root password and click OK.

      Retype root password and click OK.
    3. By now MySQL should be running. Test it using the command
      sudo netstat -tap | grep mysql
    4. In case mysql is not started, you can restart it using below command
      sudo service mysql restart

    Install MySQL Workbench 5.2.39

    You can install workbench in 2 ways. One is by using sudo apt-get and other is by downloading .DEB file from mysql.com, here is the link. In the above step we have seen installing using sudo apt-get, lets try using GUI installer this time.

    GUI installation using .DEB file

    1. Download the .deb file from mysql site.


    2. Double click the .deb file to launch installer

    3. Click Install

    4. Installation complete
    5. Test it once


    For those who are interested in sudo apt-get, use the below commands
    1. sudo add-apt-repository ppa:olivier-berten/misc
    2. sudo apt-get update
    3. sudo apt-get install mysql-workbench-gpl

    Read more on Ubuntu site about installing MySQL Server and MySQL Workbench.

    Installing Oracle/Sun Java in Ubuntu 11.10

    Mostly Linux systems comes with Open JDK. In order to install Sun/Oracle Java, follow the steps below. Please note! you will need sudo access for this. In this section I will install Sun/Oracle Java version 1.6.0_06.

    1. Test for Java version installed. Use command java -version.
    2. sudo add-apt-repository "deb http://us.archive.ubuntu.com/ubuntu/ hardy multiverse"

    3. sudo apt-get update
    4. sudo apt-get install sun-java6-jdk


      Select Ok

      Select Yes
    5. java -version (check the java version installed)
    6. javac -version (check the javac version installed)

    In case java is not showing Sun/Oracle JDK as default. You can use below command to set the default version of Java.

    • sudo update-alternatives --config java

    Installing and Setting Up Git in Ubuntu 11.10

    With the new job I got to do so many new things and one of them was Git. Git is a distributed version control system. To know more about Git you can follow these links on wikipedia, git's web site and github. In this section I will use Git version 1.7.5.4.

    Prior to Git I have worked on many version control systems such as CVS, SVN, Clear Case and MKS. Git, not gives a way to manage your repositories but you can also become social coder. Its social network on github.com makes it different and more interesting. Here we will see how to install git and configure it.

    What you will need
    1. Git software including git-core*, git-gui
    2. Account in github.com. You can signup for free account in github.com
    Install git
    1. Before installing check if git is already installed, open terminal and execute git command. You will see whether git is installed or not.
    2. Open Ubuntu Software Center, search git-core and install it.
    3. As shown in step 2, install git-gui from software center.
    4. Verify Git installation (git-gui).
    5. Open terminal and execute git command. You can check the version also as shown below using the command

    Setup git
    Now, I will setup github account.
    1. Open terminal, execute the command
      git --version
      
    2. Execute this command to generate SSH key
      ssh-keygen -t rsa -C "manohar.negi@komli.com" 
      
    3. Copy the contents of /.ssh/id_rsa.pub file
    4. Sign in to github account
    5. Account Settings --> add new ssh key with the value as the contents of id_rsa.pub file
    6. Test the connection
      ssh -T git@github.com
      
    That's all. With this you will be able to use git.